How to: Fund Your Polygon Wallet
By Damon Peters, founder of Immutable Type
GM, GM, GM,
We’re about to drop a number of new free-to-mint NFTs on the Polygon blockchain from Immutable Type, so we want to help everyone brush up on the skills necessary to become a collector on Polygon!
Collecting Polygon NFTs is a new experience for many, so I’ve created this short explainer article to help folks begin collecting NFTs on Polygon.
DISCLAIMER: DYOR. The following is not financial advice. This is a guide to introduce collectors to the concept of funding a Polygon wallet to collect Polygon NFTs.
Nothing here is an invitation to purchase a security or financial instrument. Consult with a profession and do your own research. I’m just an enthusiast working to change the world.
Brief Background Info
Just like the first time we set up our Ethereum wallets and funded them with ETH, we need to set up our Polygon wallets and fund them with MATIC.
MATIC is the native token of Polygon, and it’s what we use to pay gas fees.
“Gas” is the word used to describe transactional fees on blockchains. It’s how the networks are compensated. Polygon gas fees are extremely low in comparison to Ethereum, which is why we have chosen Polygon for Immutable Type.
Having MATIC accessible from our Polygon connected wallet allows us to transact and collect NFTs on the Polygon blockchain. Without MATIC, we are not able to execute transactions on Polygon.
What if I already have MATIC in my Ethereum wallet or Coinbase account. Why can’t I use that?
Well, you’re ahead of the curve here, but you still need to connect a wallet to Polygon and hold MATIC on Polygon mainnet.
MATIC accessible from your Ethereum connected wallet will make “bridging” easier if you choose to bridge. We cover bridging later in the article. No need to buy MATIC now; it’s just an fyi for those who already hold MATIC.
Funding and Connecting a wallet to Polygon
Like many things in life, there is an easy way, and a hard(er)way to connect our wallets to Polygon and hold MATIC. We’ll cover both options.
The “easy way” will connect your existing MetaMask wallet to the Polygon mainnet. I provide instruction about how to purchase MATIC tokens directly within a MetaMask wallet using a debit or credit card, Apple Pay, ACH transfer, or wire transfer.
The “hard(er) way” connects you to the Polygon mainnet and Polygon Wallet suite using Metamask. You’ll be able to bridge funds to Polygon from the Ethereum Mainnet, as well as use the “easy way” if you so choose.
The “Easy Way” (5-15 minutes of effort)
Four “easy way” steps:
Open your web3 enabled wallet. I use Metamask.
You may download Metamask here if you don’t have it loaded on your device. Metamask Download
I recommend doing this on your own computer. Here is a link to setting up your first web3 wallet with Metamask, as this article does not cover the subject. https://support.metamask.io/hc/en-us/articles/360015489531-Getting-started-with-MetaMask
Switch the network from the Ethereum mainnet to the Polygon network.
Many collectors do not realize their wallets are connected to the Ethereum mainnet. Simply click the dropdown at the top of the wallet UI to find the available networks for your wallet.
Wallets allow users to navigate between different blockchains, which is what we are doing when we choose a new network from the list.
If POLYGON IS NOT VISIBLE as an option within the dropdown, you’ll need to take the following steps to add it manually:
The Polygon network may be visible and easily added for some users, as per this video clip: Add Polygon Network to MetaMask - Watch Video
Or, you may need to add the network manually, as follows:
Click the network dropdown menu as per this image below. (
This is the same image as above but provided for clarity.)
Click “Choose RPC” or “Add Network” (whichever displays)
Choose “Settings” in the new form that opens
The following fields will appear in the form. Enter the below information:
Network Name: Polygon Mainnet
New RPC URL: https://polygon-rpc.com/
Chain ID: 137
Currency Symbol: MATIC
Block Explorer URL: https://polygonscan.com/
Click “SAVE”. You’ve added Polygon Mainnet as an option to the “Choose Network” dropdown list
NOW choose Polygon from the dropdown to switch networks. Boom!
Extra help: This is the link to Polygon’s official instructions, which I’ve referenced to summary the above:
https://wiki.polygon.technology/docs/develop/metamask/config-polygon-on-metamask/
Once connected to Polygon, click “Buy” within your wallet to purchase MATIC tokens.
I, personally, choose a small value, such as $10-$20 USD. Tokens vary in value in relation to USD value, so my personal strategy is to hold a low balance.
Depending upon the payment method chosen, your MATIC should be available within a few minutes. The payment method informs you of the expected wait time, so please do your own research.
Once the MATIC is available, your wallet balance will update, and you’ll see you total quantity of MATIC token within the wallet interface.
You’ve FINISHED the easy way!
Congratulations! You’re now on the Polygon mainnet with MATIC tokens! You are way ahead of the curve and may now engage with dApps like Immutable Type on Polygon!
Here is a video of this “Buy” example:
The Hard(er) Way (15-45 minutes)
Why would anyone do it the hard(er) way??
The hard(er) way is important as well, because this method teaches users how to “bridge” existing funds from the Ethereum mainnet to the Polygon mainnet, as well as gain access to the broader network of dApps on Polygon.
I recommend learning how to navigate Polygon’s technology by becoming familiar with the following methods. It’s more advanced but will increase your ability to make use of the powers of Polygon.
To Begin:
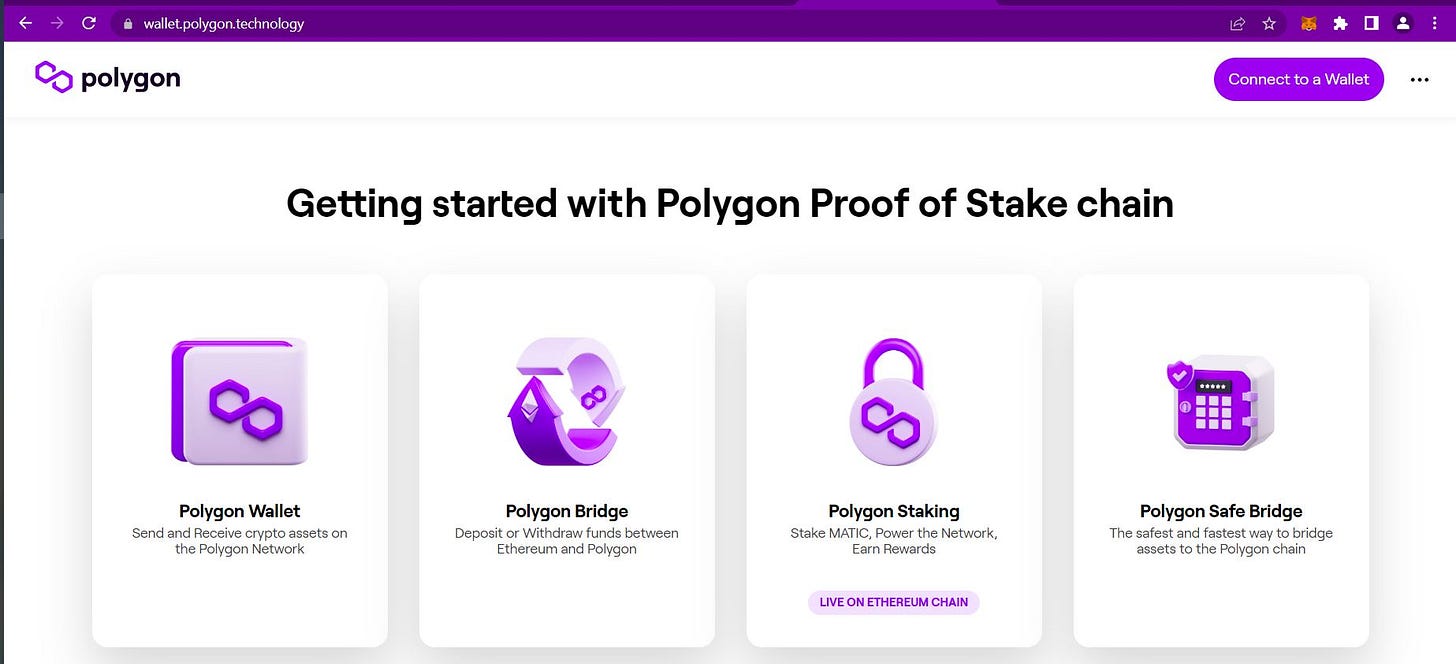
On a computer, navigate to the Polygon website via this URL: https://wallet.polygon.technology/
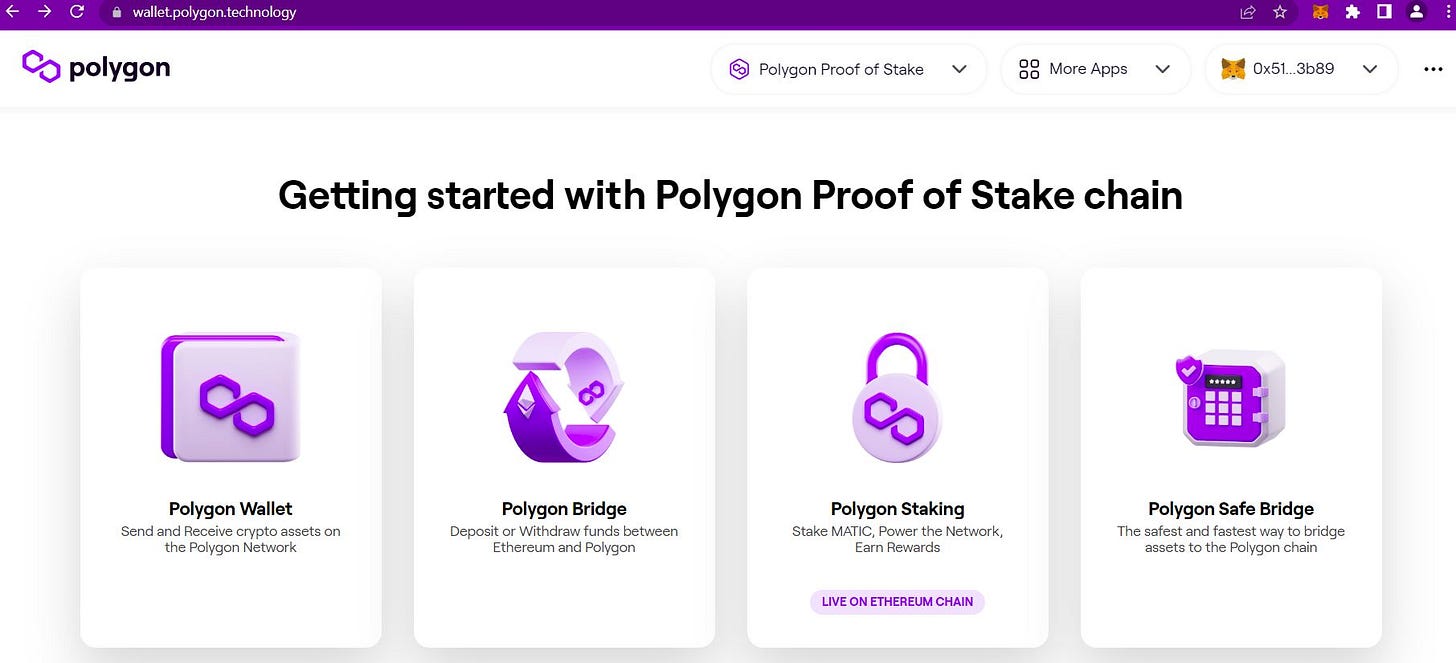
You’ll see a version of this page » Click on Polygon Wallet.
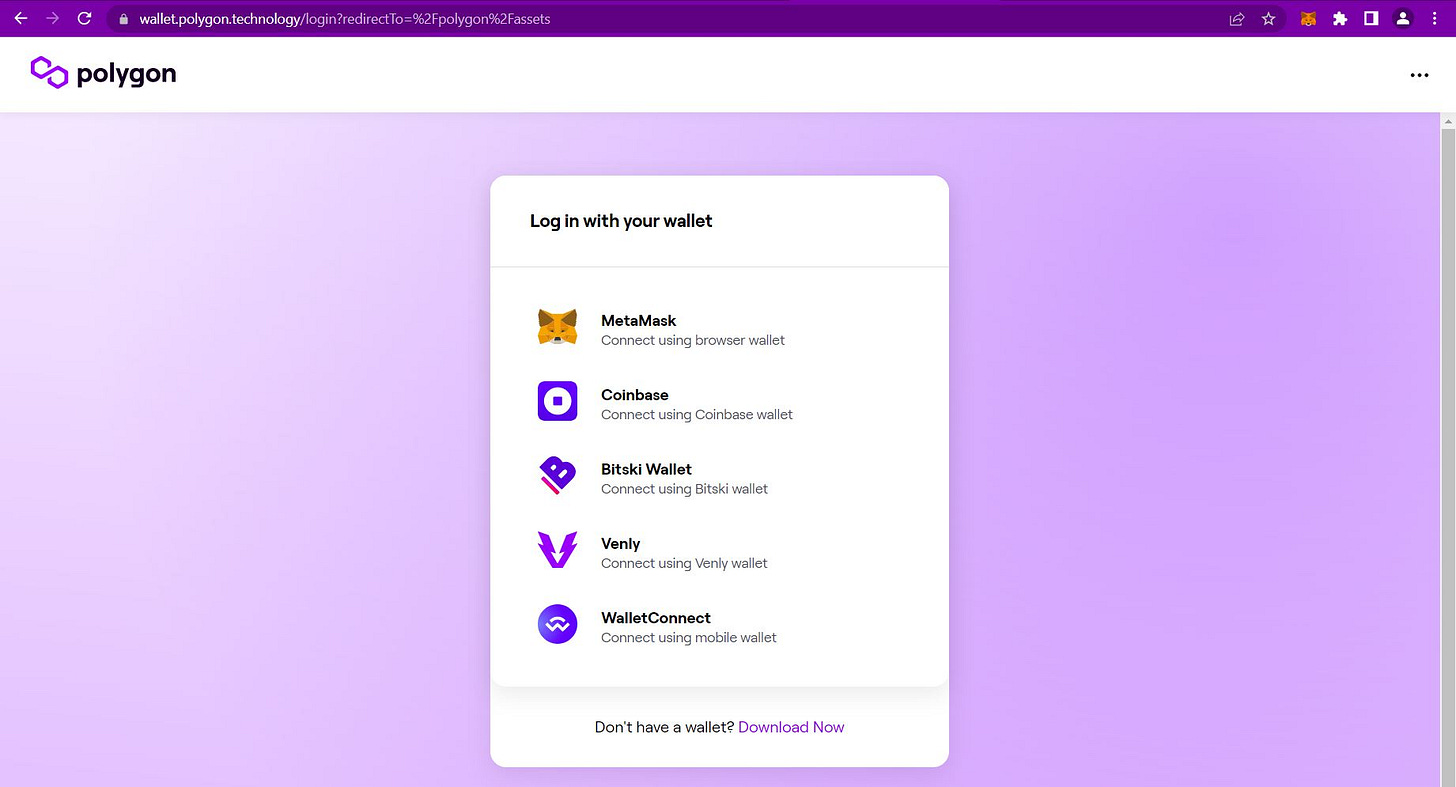
You will then see a version of the page below.
Click on the wallet you use for your daily transactions.
I, personally, click MetaMask, as that is my preferred wallet.
Tip: make sure you’re signed in to your wallet prior to clicking your preferred wallet.
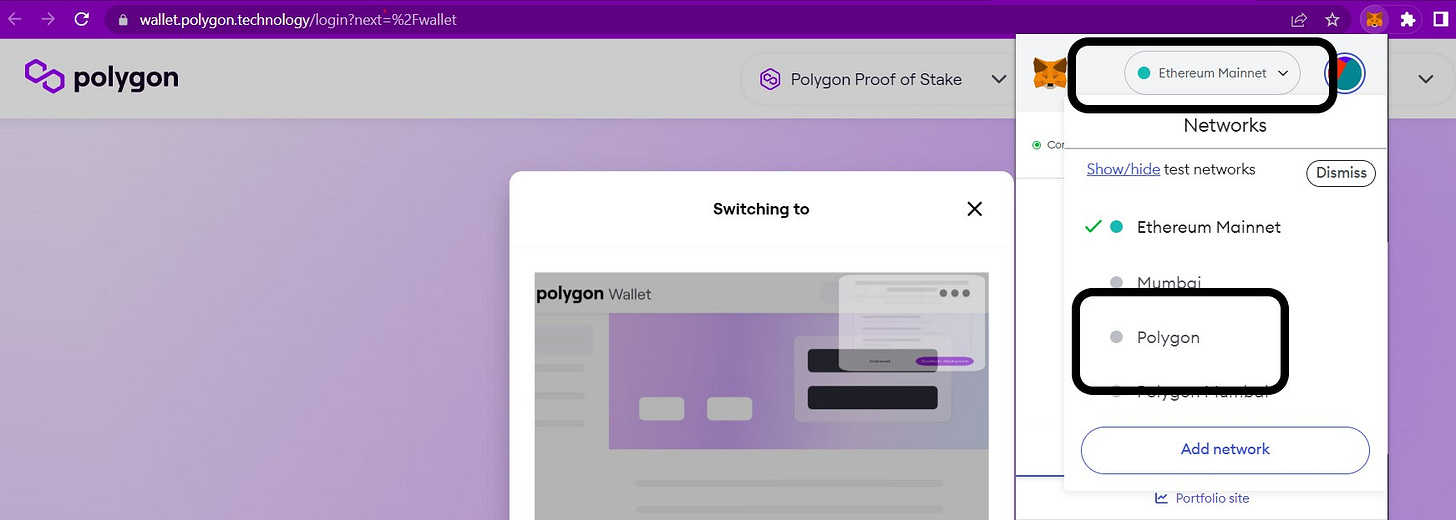
Once you have connected your wallet to the Polygon Wallet Suite, you must switch blockchains from Ethereum mainnet to Polygon mainnet.
As per the circled indicator below, you may notice you are connected to the Ethereum mainnet.
As indicated from the dropdown list, choose Polygon. You will leave the Ethereum Mainnet and be connected to Polygon. Good news!!
NOTE: If Polygon is not listed as an option, please see the instructions in the “Easy Way” to add Polygon as a network.
Once connected to Polygon mainnet, you will again see the screen below, BUT you are now connected to Polygon and ready to use their wallet suite.
Click on Polygon Wallet as shown below.
Tip: Polygon does not offer a downloadable extension at this time. This method is how we access our Polygon wallets.
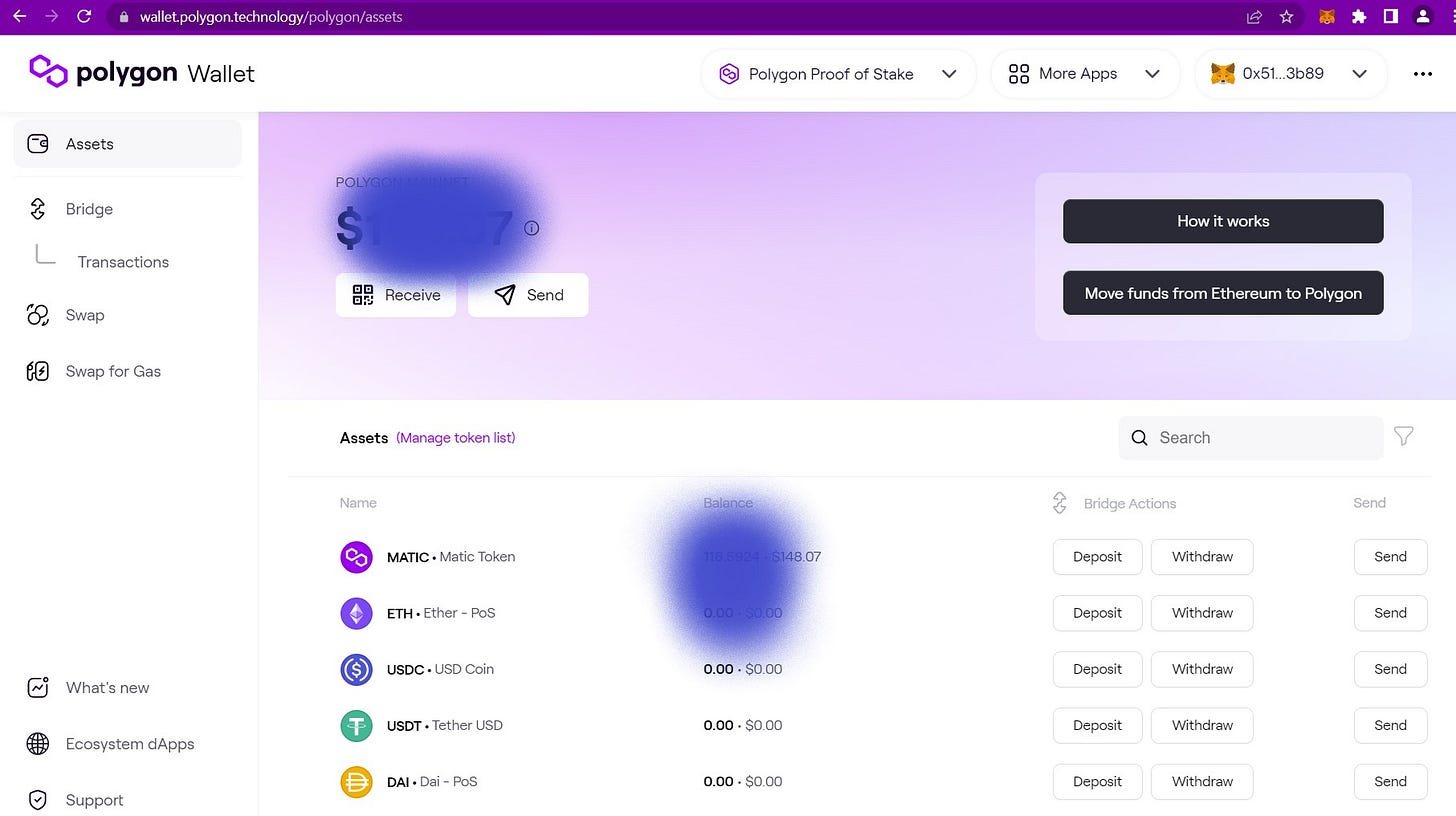
Upon click of the Polygon Wallet graphic above, you will then be live and have access to the Polygon Wallet. You will be presented a view similar to the one below:
From this access within the Polygon wallet suite, you’re now able to execute a number of actions:
BRIDGE funds from Ethereum to Polygon
Send or receive funds between other Polygon wallets
Deposit funds via the Metamask Chrome Extension (just as in our example within the “Easy Way”)
Congratulations! You’re now on Polygon and simply need some MATIC to begin collecting. You can stop here and fund your account using step #3 above if you choose!
Or, you may soldier on and learn to Bridge!!!!!!!!!
Briefly About Bridging
Bridging sounds confusing and scary, but with a little experience it becomes second nature.
The situation for bridging is this: A person has funds on Ethereum, and he/she would like to move a portion of those funds to Polygon. A “bridge” is a technology solution to move funds from one chain to another, so this person uses the Polygon bridge to move those funds TO Polygon.
So, that being said, we’re going to learn how to move those funds from an Ethereum balance to a Polygon balance using web3 wallets on Ethereum and Polygon.
The person bridging must control both wallets to execute the bridging.
Security note: never give someone else your private keys or access to control your wallets. This is crypto security 101. You must be the holder of your keys and your funds. There is nobody to help you here, so please DYOR on wallet security and become an expert. There are no managers, no customer service reps, no recourse for losing your funds and/or wallet access. Use small balances and practice security basics.
Another, quick, important, note: Bridging is not SENDING from an Ethereum wallet to a Polygon wallet. This will not work, as they are completely separate blockchains. We need to use a bridge to move funds. Read along, it’s going to come together. You’re doing great.
Here we go:
First, click the “Bridge” link on the left-hand navigation, as per below example.
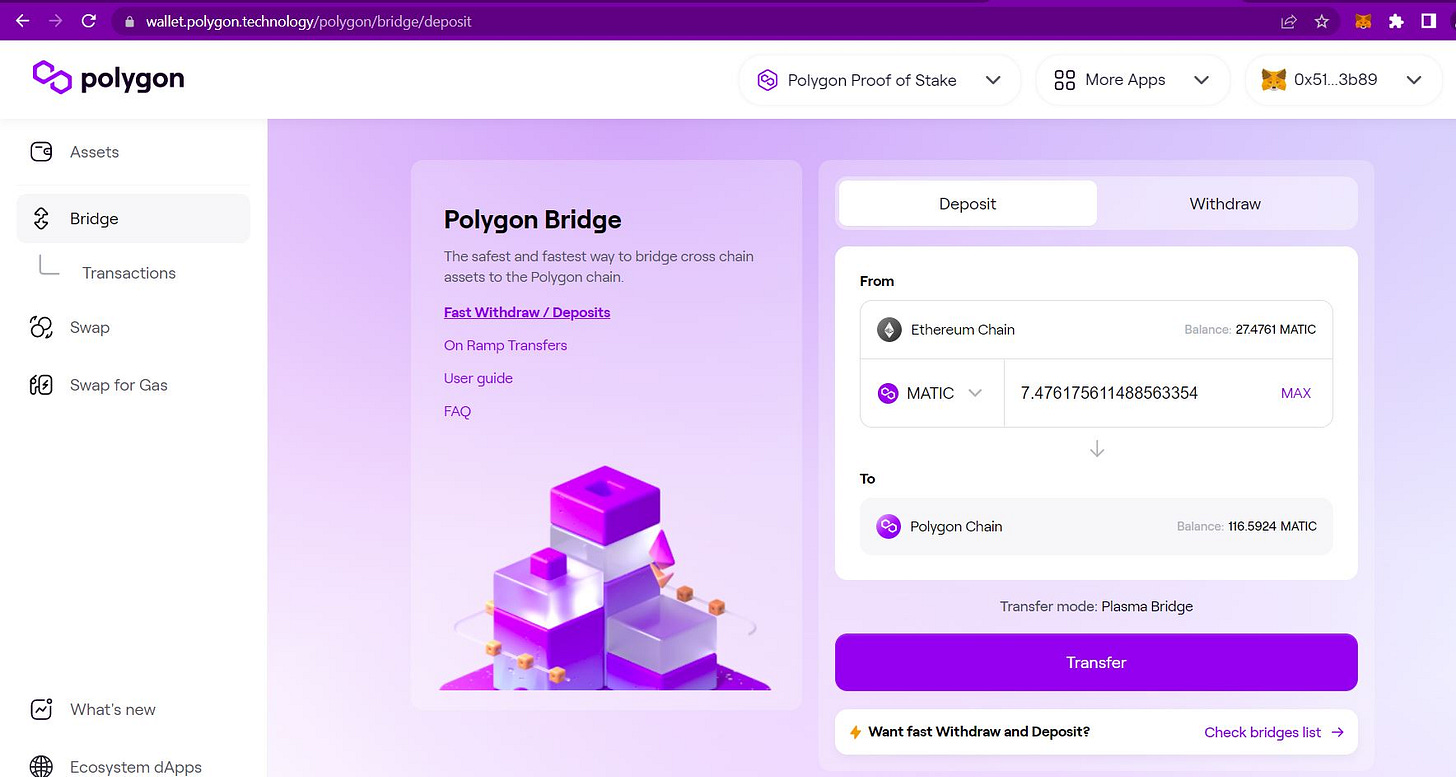
As the user who wishes to bridge, you will be connected to the Polygon bridge and be able to see this screen:
https://wallet.polygon.technology/polygon/bridge/deposit
The above example shows ~27 MATIC available on Ethereum Chain. That is the value of the MATIC funds this holder has available to bridge as accessible by this specific Ethereum connected wallet.
We have chosen a little over 7.47 MATIC to bridge to the Polygon Chain from the Ethereum Chain balance.
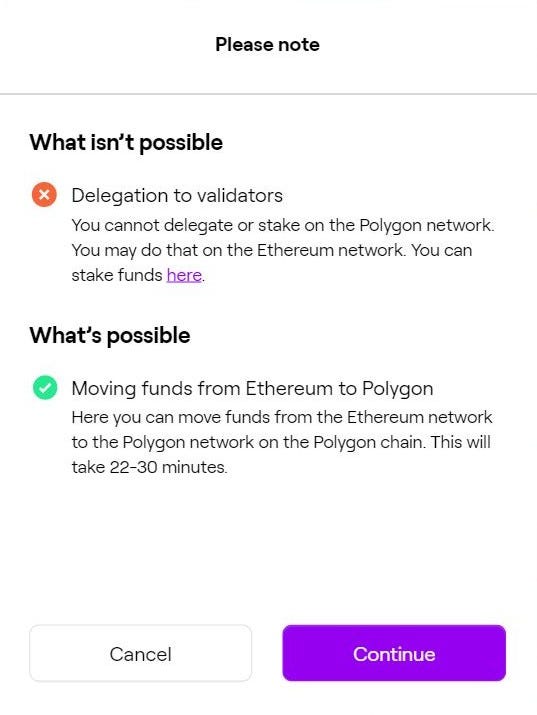
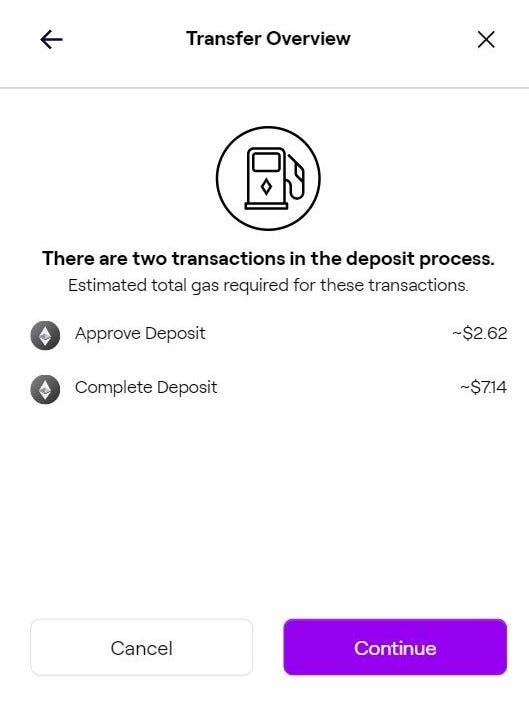
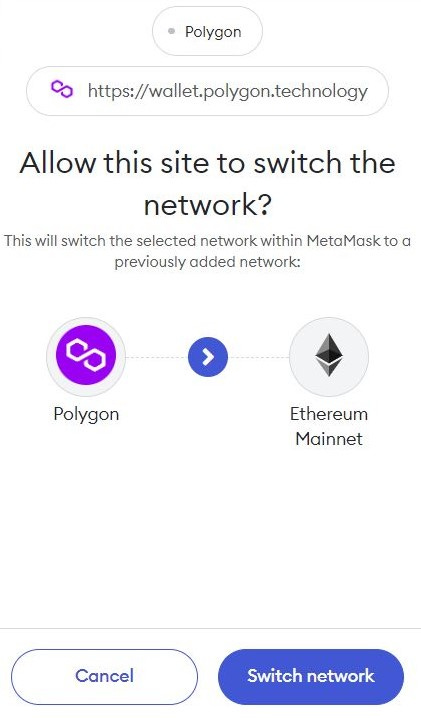
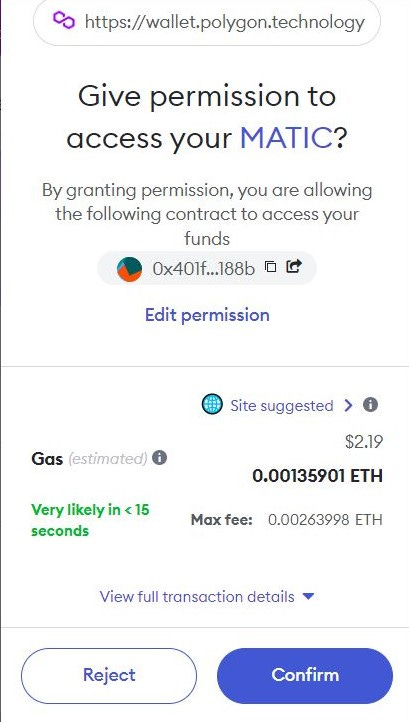
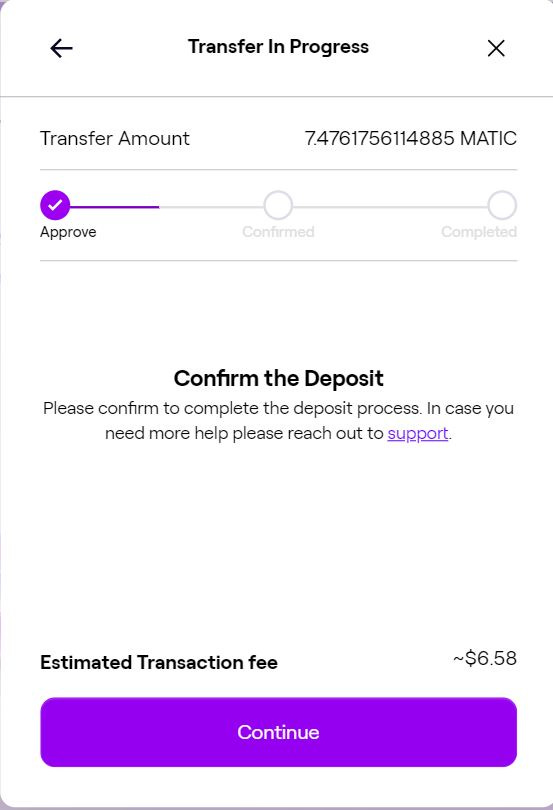
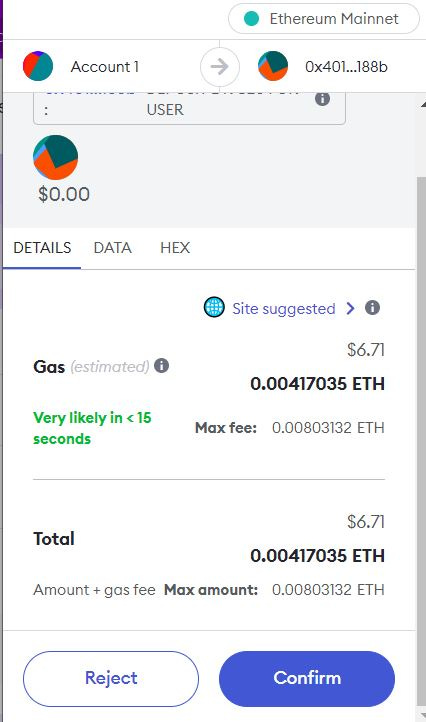
Upon clicking “Transfer” the user will be shown a sequence of eight informational and approval windows between the Polygon UI and the MetaMask wallet extension UI. Read each carefully and decide to approve or decline each step.
Declining will end the bridging transaction and funds will not transfer.
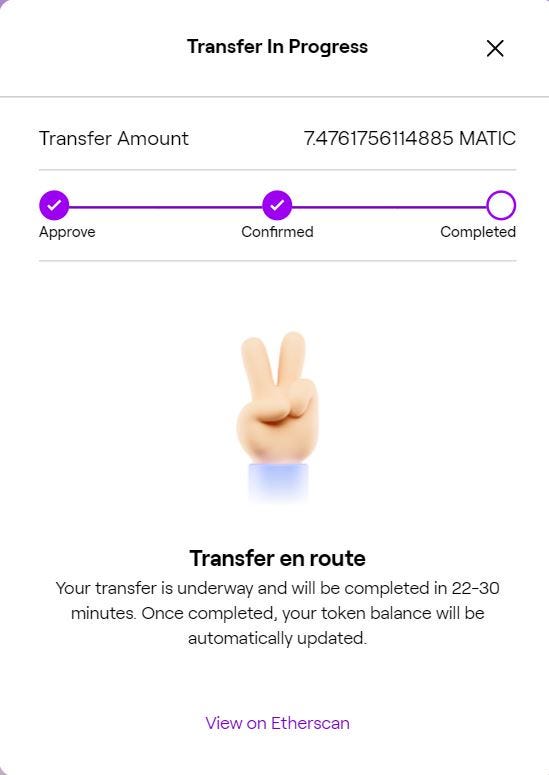
I have provided screenshots for each of the eight steps within the gallery below.
The sequence progresses from left to right within the gallery and wraps to the next line to continue the example sequence.
Note: The final screen is the confirmation screen and includes the message that the funds will become available within 22-30 (approximately).
Note: Pay close attention to the gas fees when bridging. Gas is a variable fee dependent upon network traffic, so gas is lower during low traffic times of the day. Mornings and evenings are good opportunities to realize lower gas fees. Gas fees are unavoidable, as those are the fees which compensate the network for doing work.

Congratulations!
We’ve made it!
We’re on Polygon together and now is the time to have some fun!
Polygon is an incredible network being adopted by some of the largest brands in the world.
Here is an article with a list of familiar brands! From Starbucks, to Reddit, to Draft Kings, to Facebook (Meta), Polygon is doing well for itself.
We have chosen Polygon for its low gas fees and high utility as a network to build software to onboard Journalists to Web3.
You are now part of this network and ready to collect NFTs in support of Immutable Type. We can’t thank you enough for taking this journey. You’re incredible!
Now, give it a whirl. Head over to Immutabletype.com and collect some free-to-mint NFTs.
Thank you to the MATIC gas gods for inexpensive transaction fees!
Thank You! Thank You! Thank You!
As always, thank you for reading and sharing. I’m excited for the upcoming drops on Immutable Type.
We’re learning loads each day and hope you enjoy the work as we build.
Cheers,
Damon Peters
Founder, Immutable Type
P.S. Have the person next to you scan this QR code to navigate to ImmutableType.com.
They’ll thank you one day. ;)


